Wednesday, November 28, 2012

Unknowns continued

The last post covering the unknowns described my methods for obtaining and plating out my potential unknowns. Of the plated group, only the non surface sterilized mites, non sterilized thrips, and the one week old bean leaves yielded any fungi.

Non-sterilized thrips

A sub-culture of the fungus I obtained from thrips.
On my non-sterilized thrips, I managed to get colonies of the same looking fungus coming from each thrips. I took a sterile transfer from the initial plate and started a pure culture. Upon examining the sample under the microscope from a riddel mount, I realized that this fungus was in fact Penicillium, a fungus that we cannot use for this course. So, on to the other two for a better shot at a useable unknown. 
Under the microscope: Penicillium the thrips fungus.
Non-sterilized mites

A subculture from the fungus I obtained from spider mites. The center looks like a contamination by Penicillium . 
 On the plate of 10 spider mites, I had a same morphology fungus growing out of each of the spider mites, so I took a subculture from one of them to start a pure culture. Apparently I used poor technique because it appeared that Penicillium had made it into my plate as well. For future work, I used only the dark looking fungus. I had a bit of trouble identifying this fungus. When I attempted to key it out, I would come to multiple conclusions, dead ends, or couplets that I didn't really have enough evidence to decide. With the help of Dr. Shaw, we have decided to call this fungus Drechslera, but I am going to sequence this soon to confirm this identification. I based my decision off of the shape of the conidia; they were cylindrical and rounded at the end, multi-spored, generally with straight walls dividing the cells. The conidia did not appear to grow in clusters either. Over time the conidia became darker, but initially they appeared fairly light.

Conidia on the conidiophore of Drechslera.
 When comparing the above image that I took, to the picture from the Barnett book, you can see they generally look similar in their formation.


Fed upon leaf material

I did not get very much material growing from the sterilized fed upon leaf material, but I did get one fungus that I was able to sub-culture to water agar. For almost two months I could not get any conidia to be produced, so I transfered a plug to 1/2 PDA, allowed it to grow in a L:D 14:10 for a week, then placed it in continuous light for 48 hours, then total dark for 48 hours. I'm not sure if it was the light schedule or the nutrients provided by PDA, but I was able to get conidia to form eventually.

The subculture I took from the initial plate with used leaf material. 

Conidia that I was eventually able to produce from this fungus. 
Once I was able to produce conidia, it was pretty apparent that this was Nigrospora. The short, urn-shaped conidiophore, and the dense, shiny black conidia and very obvious in this fungus. This is pretty textbook looking, so I am very confident that this is Nigrospora.

Nigrospora in the textbook. This is exactly what my fungus looks like.

Additional sources for fungus

At this point I had only identified two fungi, but needed three. I initially wanted to sample various plants around the lab to see what endophytes they had, but time was not something that I had a lot of, so I settled for sampling rather random things. I collected some water from my fish tank, frass from caterpillars, fungi growing on some pinned insects, open plates left in the lab etc. While each of these gathered quite a few colonies of fungi, most of them were group I fungi, or so delicate that I was never really able to get a good look at the conidia on the conidophore. The one plate that I was able to get my final fungus came from a mushroom that I collected in my back yard...

Mushroom collected fungi

After we had a bloom of mushrooms around town, I decided to take one from my back yard into the lab to plate. I simply plucked the mushroom from the ground, placed it in a sterile bag, and then at the lab I used a sterile blade to excise a 1 cm cube from the gills. 

The mushroom I selected from the yard. 

A close up of the gills. There is a lot of dirt and junk under here that should lead to some various fungal colonies when plated. 
 
The excised piece was smeared on a couple of 1/2 PDA plates, and then the piece was placed in its own plate. The plates were allowed to grow for a few weeks, and I got several different types of colonies.
One of the plates from mushroom with various colonies growing.
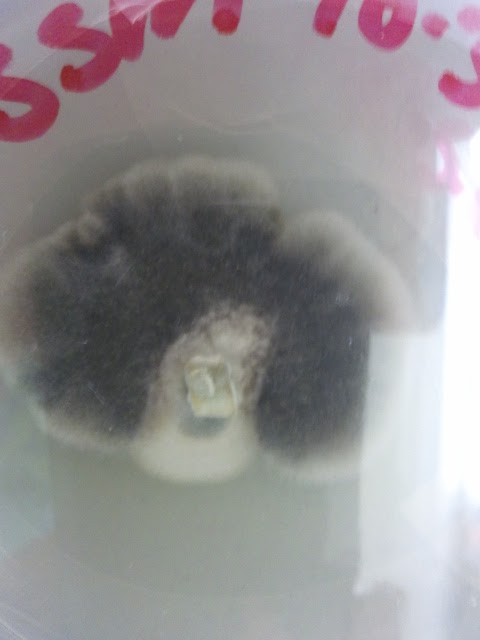
I selected several colonies that were interesting looking to me to isolate for further investigation. Most of them were either the common fungi or too difficult to identify. One, however, maintained its composition when viewed with tape mounts, and I was able to identify the fungus. 
A view through the plate of the third fungus I identified.
I identified my final unknown as Monocillium. This is saprophytic in soils, so it is not very surprising that I would find it on a mushroom. The conidiophore is swollen, followed by a chain of single celled hyaline conidia. 
Monocillium under the microscope.
In this picture you can see the swollen conidiophore and chains of conidia. This looks very much like the image in the book. 
Monocillium

And that is it for the unknowns- Nigrospora, Drechslera, and Monocillium! It was quite the learning experience going through all the fungi that I grew trying to find some that would work for the class, but it was well worth it to help me in my future work. Thank you Dr. Shaw and Dr. Ebbole for your help this semester! 

Tuesday, November 27, 2012

November 21 Lab

The goals for this lab were to:

  • Bottle the fermented beer
  • Finish up our unknowns
Bottling beer

     The beer that we began brewing in October was now ready to be bottled. A lot of the time people have to gather a large quantity of glass bottles to put the beer into, but Dr. Shaw recently purchased a keg, so we were spared the time and hassle of capping numerous bottles. We did individually bottle 12 bottles; as a comparison to the kegged beer, but also to try Carb Tabs, individual tablets of priming sugar that can be added directly to the bottle. This spared us from having to measure out the bagged priming sugar, as we were not adding it to the bulk of the beer due to the fact that the keg beer will receive its carbonation through a CO2 tank. We began the day by sterilizing with Star San everything that would come in contact with the beer: bottles, keg, caps, lines, etc.
A bucket of Star San ready to sterilize our stuff.
The Carb Tabs were placed in each bottle, 4 each for average carbonation according to the directions. Then we filled the glass bottles by placing one end of flexible tubing into the beer, siphoning beer through the line, placing the tubing tip on that aids in filling the bottles, and then placing the tip to the bottom of the bottle and filling until full. Then the hand-held capper could be used to secure the cap on the bottle.
Charity modeling how to use the capper.
     The next step was to fill the keg. We poured some Star San solution into the keg, then used the CO2 tank to run the solution through the lines. Once a bit of solution had run through the lines, we emptied the keg of sanitizer, then siphoned out beer from the carboy into the keg.
Siphoning beer into the keg or bottles.
Sedimentation of proteins at the bottom of our brew. 
 We made sure the leave any sedimentation at the bottom of the carboy and not include this in our keg beer.

 Once full, the keg was sealed and then attached to the CO2 tank and pressurized to 20 PSI. It will need to remain pressurized for a while to get the right consistency. 

The keg and CO2 tank.
A capped and final product of this brew!
Finishing up unknowns

I did not bring any unknowns to work on today because I am mostly done with the project.

November 14 Lab

I was not able to attend this lab because I was attending the Entomological Society of America Annual Meeting in Knoxville, TN. Here is a brief overview of what the lab did while were gone, including pictures provided by Lorna Nissen.

The purpose of this lab was to:

  • Grow mushrooms! Either pearl or shiitake. 
  • Transfer beer into new carboy
Growing mushrooms

My team (Lorna, Danny, Charity) was given a kit for growing both pearl and shiitake mushrooms. The oyster mushrooms were set up by placing the provided bag of growing media on a tin tray and erecting a tent of clear plastic and sticks around the bag. This needs to be misted with spring water several times a day. 
The directions for the oyster mushroom kit. 

What the kit looks like inside the box.

Adding water to soak shiitake kit.

Spraying the oyster mushroom kit with spring water.

Placing the "tent" over the oyster mushrooms.


The shiitake mushroom media was submerged in mineral water for 2-3 hours. It was then removed from the water, taken out of the bag that it was provided in, placed on a tray, and covered with a clear plastic bag. This also needs to be misted several times a day. These will both remain in the lab until they are ready for harvest in a couple of weeks.

Directions for the shiitake mushroom kit.
Beer transfer

The beer in the original carboy that had been fermenting needed to be transfered to separate it from any proteins that had precipitated out of the solution. They sterilized a new, smaller carboy, and then transfered the beer into this one. It will be bottled next week.

November 7 Lab


The goals for this week were to:
  • Go to the Monterey Mushroom facility in Madisonville
Monterrey Mushroom tour

Today we got to visit the Monterey Mushroom facility in Madisonville, TX and take a tour of their white and brown mushroom growing facility. Madisonville is located about 50 minutes outside of College Station, so it was a little bit of a drive to get out there. Once we were there they first took us to a meeting room to discuss the production process before going to show us. To avoid butchering they steps in the process, I'll post the steps per the montereymushrooms.com site:

How They Grow

Mushroom growing requires five steps, then packing, before Monterey® fresh mushrooms are shipped to customers.

Phase I

Straw bedding from horse farms, or baled straw, protein meal, gypsum and water are mixed together and kept outdoors to be biochemically converted into the preliminary food source for the mushroom by the tremendous heat naturally evolved.

Phase II

The compost produced in “Phase I” is mixed with vegetable oil and more water, then filled into wooden trays before “Phase II” starts. Once into the “Phase II” room, the compost is pasteurized to free it of weed molds and insects, then cooled down to room temperature so that the mushroom spawn can be added. “Phase II” requires six (6) days to accomplish.

Spawn Running

After the spawn has been planted, it will grow in thirteen (13) days to completely cover the compost that is now serving as a food source.

A Brief Description of Mushroom Production Case Holding and Growing

A mixture of peat moss, limestone, and water is applied to the top of the tray. The spawn starts to grow in the mixture and in a few days, carefully controlled environmental changes bring about fruiting or pinning.
The environment is controlled carefully to encourage the mushrooms to reach maturity. Size and quality are of utmost importance. The mushrooms are then picked skillfully, according to size and maturity, and hand sorted into baskets. The stump is trimmed and discarded. The crop is actually picked for up to four breaks, or 28 days, and then dumped and replaced with a new crop.

Packing

The harvested mushrooms are immediately placed in a cooler, chilled, then packed in a film-wrapped container or bulk boxes and moved into the finished product cooler. Very strict quality control checks are used to assure a high quality product. The boxed product is then placed in refrigerated trucks and delivered to the markets within 24-48 hours after harvest.

The progression of straw as it goes through the compost process.


The large machine they use to pack the wooden beds with compost.
A conveyor belt that takes compost into large storage rooms for further processing.


The compost being deposited into one of these large storage rooms.


Spawn and compost that has been placed into a wooden tray to develop and grow.


Stacks of trays that will eventually house mushrooms.


Bags of the spawn. They bait seeds with spores to make distributing spores easier on the trays.


A close up of the baited seeds.


Mycelial growth in the compost.


A layer of peat moss mixture that has been placed on top of the compost/spawn mixture.


The start of mushroom growth!


Older mushrooms growing all over the tray.


Rows and rows of mushrooms growing.


Mushrooms are cut by hand and sorted by size.


In the center of the picture, an unwanted fungus that can take over.


Another example of a fungus that can take over. They call this one the spiderweb fungus.


The brown mushroom variety.


Bales of straw that will be converted into compost.


A large machine that rolls through and turns the compost pile. 

October 31 Lab

The goals for this weeks lab were to:

  • Brew beer!
Brewing beer

Today we began the process of brewing beer. Because there is a lot of time in between steps to reach the right temperature or amount of time at a particular temperature, the day was spent brewing for a bit, then listening to a lecture about brewing beer and the processes behind each step until the next step was ready. 

Dr. Shaw had already begun the first step of boiling 2 gallons of water to 66.1C. We used a hot plate as well as microwaving water to help speed up the process. Once the temperature was reached, grain could be added to the mixture. Depending on how long the grain was initially roasted, this will determine how dark of a beer it will end up. This was done by placing the loose grain in a fine mesh bag that was tied off on one end, then submerged into the 2 gallons. This remained there for 25 minutes. After this time, the grain bag was removed, drained, and discarded. 

The end of the grain bag that is submerged into boiling solution.

An additional gallon of water was added to the solution, and brought back to a boil. Once the boil was achieved, the heat was turned off, and the two malt extracts and bag of sugar were added. The malt extracts and sugars will later be converted by the yeast into alcohol! These new ingredients were stirred constantly to help dissolve them into the solution.
One of the malt extracts being added to the wort. 

 Once dissolved, heat was added to cause the solution to boil. This was also stirred constantly to avoid any of the beer from burning. After this boil was achieved, bittering hops were added and boiled for 60 minutes. In the last 15 minutes, the flavor hops were added, and finally in the last 5 minutes the aroma hops were added. Since the mixture, or wort, was still too hot to add the yeast, we transfered the pot to an ice bath and brought the temperature down. This was then transfered to a carboy that had been previously sterilized by Star San. 
Transferring the wort to the carboy.

A small sample was taken to measure the specific gravity before the yeast was added, and it came out to 1.05, precisely what it needed to be for this recipe. 
Measuring the specific gravity.

We also took a sample for us to all try. The beer was definitely very hoppy! Finally the beer was ready to have the yeast added and be stored for fermentation to occur. We added the pitchable liquid yeast, then sealed the carboy with an airlock to allow gasses to escape, but prevent contamination from occurring. 
The specific yeast we used in this brew.

Adding the yeast to the wort.

The carboy, sealed with the lid lock.

The carboy was then transferred to a different room for storage and fermentation.    

For the other parts of class, Dr. Ebbole taught us some of the biochemistry involved in the brewing process. We covered glycolysis, glucogenesis, the fermentation pathway, the TCA cycle, and carbon regulation of gene expression and glucose sensing and signaling. Each of these plays a role in the brewing process, but to really understand this I would need to go back and study it all quite a bit. 

Dr. Shaw also filled us in with some of the history of beer making, as well as some pictures of a previous brew he had done at home. 

This was definitely one of our busier labs, I hope I can remember it all for the future brews I do!